 Today’s challenge

Have a first-person view of the Roomba cleaning, using a RasperryPi, a RPi Camera and some additional stuff.
Raspberry basic configuration
Hardware side, I used the most standard available components: a Raspberry Pi model B, the RPi Camera module and a Edimax EW-7811Un 150Mbps Wi-Fi USB card.
Regarding the OS, there are a lot of distributions available for the Raspberry Pi, but I went for a plan Raspbian: wide support, flexibility, de-facto standard. I installed it using the NOOBS setup, following detailed instruction to load NOOBS image on a sd-card under by Ubuntu pc. Then, started the RasPi, selected Raspbian from the distro installation menu, waited a little bit for the installation to complete.
In the raspi-config app, I enabled the camera and enabled SSH server. Then the usual sudo apt-get update && sudo apt-get -y dist-upgrade && sudo rpi-update && sudo reboot combo, to update everything. The RasPi is ready to rock :)
WiFi setup
Configure the WiFi is easy with the right card (this is an evergreen truth in Linux world). Because the Edimax is supported natively, the only thing I did was:
sudo nano /etc/network/interfaces |
and added these lines at the end of file (change them for a different WiFi encryption model). Alternative steps are available too.
allow-hotplug wlan0 iface wlan0 inet dhcp wpa-ssid "YOUR_NETWORK_SSID" wpa-psk "YOUR_WIFI_PASSWORD" |
Reboot and voilà, now the ethernet cable can be unplugged and the RasPi made another step toward movement freedom.
Camera software and configuration
There are different options available. Out-of-the-box, Raspian can both capture still images from camera or recording videos using raspistill and raspivid commands, respectively.
Another option is to use motion as backend to expose the camera video stream. The only problem is that stock version doesn’t (still) support RasPi camera device file, so a big thanks to dozencrows for the fixes has as done. There is a detailed forum post with the final files to replace on the RasPi, plus a couple of tutorials explaining detailed steps to have a working setup, included the sudo apt-get install libjpeg62 part.
With a working motion installation, different frontends can be used to see the camera stream, like the motion server itself, motionEye etc, and the RasPi can even be seen as a normal IP camera from lot of software, included Synology Surveillance Station.
Too lazy to do everything by hand? A complete distro, MotionPie, is an out-of-the-box solution in active development. Flashing the image on a sd-card and reboot the RaspPi is the only requirement, wifi configuration apart.
I found also another project, RaspberrIPCam, a fork of raspivid that offers a working website for accessing the camera stream, Synology Surveillance Station integration and more. Step-by-step guide here.
But, personally and because of the challenge, I chose another way: the project RPi Cam Web Interface.
RPi Cam Web Interface
This solution works in a pretty clever way: instead of using motion infrastructure, it relies on the raspimjpeg command, that is able to capture single frames from the camera stream and its configuration can be changed on the fly writing commands to a Unix pipe. Then motion is configured to point to raspimjpeg output, so it can do all its motion detection magic without a real access to the camera. And Apache serves a micro-site where camera stream is shown and some php scripts glue all together and provide additional features like an easy access to captured video files, changing camera parameters, controlling the entire RasPi from the web interface (included a restart / reboot) and much more.
To install RPi Cam Web Interface, I execute
cd git clone https://github.com/silvanmelchior/RPi_Cam_Web_Interface.git cd RPi_Cam_Web_Interface chmod u+x RPi_Cam_Web_Interface_Installer.sh ./RPi_Cam_Web_Interface_Installer.sh |
and started the whole app (only the first time), using
./RPi_Cam_Web_Interface_Installer.sh start |
The install script allows to customize the Apache directory where all the files are stored changing the rpicamdir variable value in the script itself. Doing so, it’s possible to avoid conflicts with other apps that serve additional pages and sites on the same RasPi. Additional info are available reading the bash file. Use the source, Luke!
To access the website, opening http://raspi_address/ from any browser is enough.
To disable the red light from the camera module, I run
sudo nano /boot/config.txt |
and added the following line at the end of file
disable_camera_led=1 |
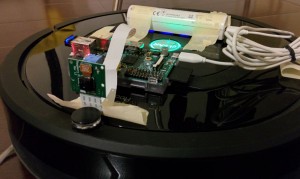
Roomba setup
Thank to the WiFi, the RasPi could freely connect to the network, and an USB power bank provided the necessary power for the experiment. Scotch tape to assemble everything and here the final result. Pretty cool, isn’t it?
(tinyCam Monitor is responsible for casting the camera stream on the TV, thanks to a Chromecast)
Notes on RPi_Cam_Web_Interface
Some salient parts of RPi_Cam_Web_Interface architecture, mainly to help my memory over time.
motion is configured to read images from local server, using netcam_url http://localhost/cam_pic.php, and this php script returns the content of /dev/shm/mjpeg/cam.jpg file, where raspimjpeg writes the camera preview thanks to the setting preview_path /dev/shm/mjpeg/cam.jpg.
When motion detects something, it executes the command on_event_start echo ‘ca 1’ > /var/www/FIFO, and the corresponding on_event_end echo ‘ca 0’ > /var/www/FIFO when the event ends. /var/www/FIFO is the Unix pipe file used to control raspimjpeg via the control_file /var/www/FIFO option. Doing so, raspimjpeg creates the video file returned in the web page with all the captured files.
All motion web-service options and recording capabilities are switched off in the config file.
When installing, a link to the camera preview file is created under Apache site directory using the command sudo ln -sf /run/shm/mjpeg/cam.jpg /var/www/$rpicamdir/cam.jpg. In this way, http://raspberry_ip/cam.jpg returns the latest image from the camera, and Android app like tinyCam monitor can points to this address to show camera stream, image by image.
To create Python app that uses the camera, picamera interface can be used.
Sunday happyness: Raspberry Pi, RPi Camera and Roomba: a first-person experience of the housecleaning: http://t.co/nOyxgZnhYH
RT @rainbowbreeze: Sunday happyness: Raspberry Pi, RPi Camera and Roomba: a first-person experience of the housecleaning: http://t.co/nOyxg…
RT @rainbowbreeze: Sunday happyness: Raspberry Pi, RPi Camera and Roomba: a first-person experience of the housecleaning: http://t.co/nOyxg…
RT @rainbowbreeze: Sunday happyness: Raspberry Pi, RPi Camera and Roomba: a first-person experience of the housecleaning: http://t.co/nOyxg…
RT @rainbowbreeze: Sunday happyness: Raspberry Pi, RPi Camera and Roomba: a first-person experience of the housecleaning: http://t.co/nOyxg…