More Telegram bot features using IFTTT

Telegram bot with IFTTT recipesNow that I created a Telegram bot fed by IFTTT, I can add new features using the available channels. A message with the Milan weather condition every morning, for example, or a cool 500px picture during the day to take a break and enjoy the beauty? Possibilities are limited only by IFTTT skills.

The logic is easy: every recipe has a different trigger (the “this” past), and the action is always the same: use the Maker channel to send a POST HTTP call to the Telegram bot, formatting the message with the specific information I want to display. To create the Telegram bot, please look to my previous post.

Weather

Telegram bot weather

The trigger to activate in the Weather channel is “Today’s weather report”, setting the time of the day the report has to be sent. I set 7.00 am because I prepare last minute, but it’s also possible to select “Tomorrow’s weather report” and receive the message the evening for the ones that want to plan what to dress the next day in advance. There are plenty of other information available in the triggers, like sunrise and sunset time, change of conditions / temperature and much more. The city is selected when the channel in connected with the IFTTT account.

The action is the “Make a web request” is the Maker channel, using the following parameters (XXtokenXX and the chat_id have to be changed with the appropriate values):

  • URL: https://api.telegram.org/botXXtokenXX/sendMessage
  • Method: POST
  • Content type: application/json
  • Body: {“chat_id”:”-235327410″, “text”:”Good morning. In Milan {{TodaysCondition}}, max {{HighTempCelsius}} min {{LowTempCelsius}}”}

Cool 500px pictures

Telegram bot with picture

The trigger to activate in the 500px channel is “New Editors’ Choice photo”, selecting one of the available categories, or any.

The action is the “Make a web request” is the Maker channel, using the following parameters:

  • URL: https://api.telegram.org/botXXtokenXX/sendMessage
  • Method: POST
  • Content type: application/json
  • Body: {“chat_id”:”-235327410″, “text”:”Breath and enjoy the beauty: [<<<{{Title}}>>>]({{SourceUrl}})”, “parse_mode”:”markdown”, “disable_web_page_preview”: “false”}

In order to have a preview of the image embedded in the bot message, I used parse_mode set to markdown and i set disable_web_page_preview to false, even if it’s the default setting. Of course the text value is written using Markdown syntax. For more information on the available parameters, the official doc is a good reference. Again, XXtokenXX and the chat_id have to be changed with the appropriate values.

Write a Telegram bot using IFTTT recipies

I want a simple and automated way to notify my wife I’m at the train station of our city, commuting to home. I know there are plenty of apps for that, but I already have an ongoing Telegram chat with her, so I created a Telegram bot that sends a message in that chat every time I’m in a particular area. How? Here the list of the different pieces to put in place:

  • Create a Telegram group chat
  • Create a Telegram bot
  • Enable bot to send messages to the group chat
  • Write an IFTTT recipe that activates the bot every time I (my phone) enter in a particular location

Just a side note: The same approach works also for other messaging apps that support bot integration and activation via webhooks. Even better for Slack, that has its own channel on IFTTT, so no need to deal with webhooks.

Create the Telegram group chat

Nothing to say here, if you already have Telegram, you know how to create a group chat between the people you want to notify. Even if the conversation is between me and my wife only, I created a groups chat and not direct message because also the bot needs to be included.

Create the Telegram bot

I followed the official documentation to create a Telegram bot, asking to BotFather for a new one, with name Lurch (oh yes, the name of my digital butler since my very first project of this kind during high school years), username YellowBot.

20160804-createbot

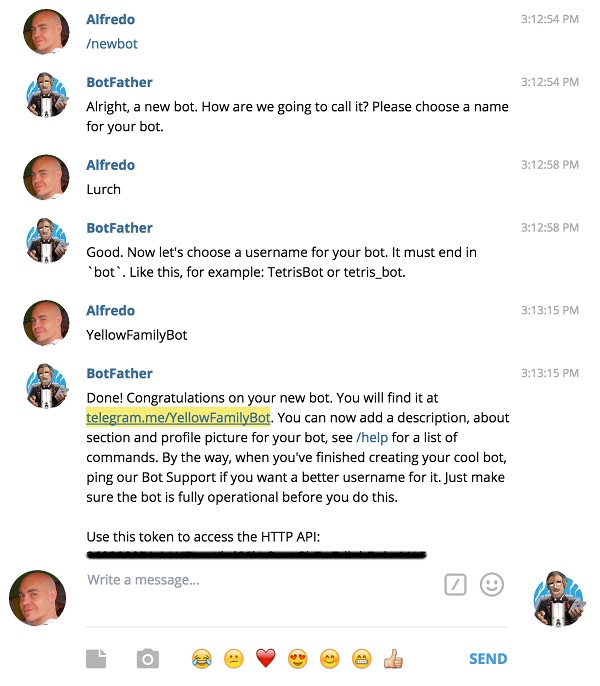
As you can see, BotFather returned a token to use while calling the Bot API. I also set Lurch profile picture using /setuserpic command.

I finally added the newly created YellowBot to the previously created group chat.

Enable bot to send messages to the group chat

Telegram exposes a convenient webhook for posting a message thru a bot: the sendmessage API. It’s as simple as making an HTTP call, with some parameters in the payload. Two of them are required, the chat_id and the message.

chat_id: as per documentation, “Unique identifier for the target chat, or username of the target channel (in the format @channelusername)“. So, the id of the group chat previously created. To obtain it, the getUpdates API can be used, using the following syntax (it’s important to change XXtokenXX with the token previously obtained by BotFather):

curl https://api.telegram.org/botXXtokenXX/getUpdates

Unfortunately, this call returns an empty json, because there are no messages for the bot so far:

{"ok":true,"result":[]}

Writing message in the group chat where the bot has been added doesn’t help, because of the privacy-mode activated by default for all the bots.  As per documentation, bots will receive only messages that start with a slash ‘/’ , so I wrote a test commmand like “/test”, but / + any combination of letters can be used. This time, the same call to getUpdates returns:

{  
  "ok":true,
  "result":[  
    {  
      "update_id":43841716,
      "message":{  
        "message_id":122,
        "from":{  
          "id":000000000,
          "first_name":"Alfredo",
          "username":"rainbowbreeze"
        },
        "chat":{  
          "id":-235327410,
          "title":"YellowFamily chat",
          "type":"group"
        },
        ....
}

So, the group chat_id is -235327410. As per documentation, a negative id refers to group chat, positive to private chat with a user.

At this point, it is already possible to send a bot message in the group chat, using a simple CURL command. I used a POST request and a application/json as content-type among the different ones available, so I formatted the payload accordingly:

curl -X POST -H "Content-Type: application/json" -d '{"chat_id":"-235327410", "text":"Hello world!"}' https://api.telegram.org/botXXtokenXX/sendMessage

obtaining a reply similar to

{  
  "ok":true,
  "result":{  
    "message_id":177,
    "from": ....

The “Hello world!” message should also appear on the group chat, with the bot as sender.

IFTTT integration to send messages using the bot

IFTTT has one channel to trigger an action when the device is in a specific location (in my case, entering the train station) for Android and for iOS, but hasn’t a dedicated channel for Telegram (yet). Luckily, the Maker channel comes in handy: what it does is to make an HTTP call to an URL specifying the kind of call (GET, POST, UPDATE etc), the content type and the message payload (if any). The exact information required to activate the Telegram bot just created.

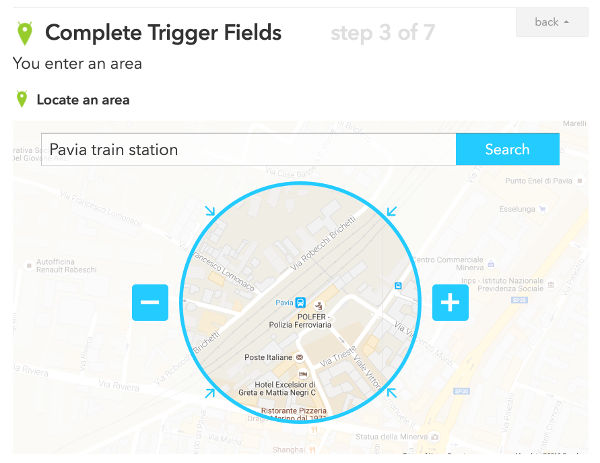
So, first step is to create a new recipe with the Android Location channel as “this” part. Once downloaded the IF app for Android on the phone and connected the channel, I selected the “You enter an area” trigger, selected the area of my interest and created the trigger

IFTTT location trigger

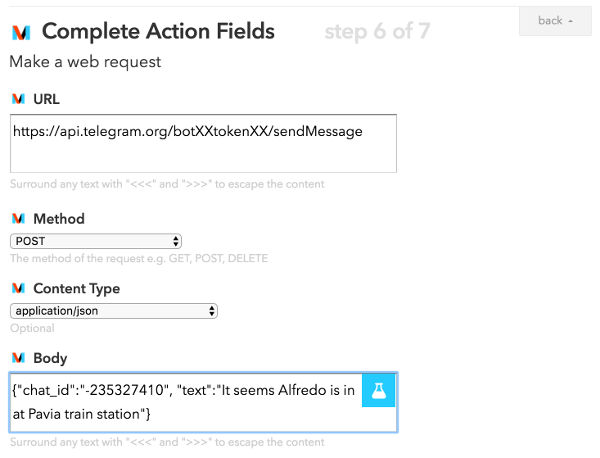
For the “that” part, I selected the Maker channel and “Make a web request” as trigger, using the following parameters:
URL: https://api.telegram.org/botXXtokenXX/sendMessage
Method: POST
Content type: application/json
Body: {“chat_id”:”-235327410″, “text”:”It seems Alfredo is in at Pavia train station”}

IFTTT Maker channelThat’s all. Once I’m nearby the train station, the bot send a message in the group chat. Obviously, there are things to improve. For example, the recipe fires every time I’m around the location, even if I’m there for a walk. It would be great to activate the recipe only for a particular time interval, but IFTTT doesn’t offer this option. But the recipe could be manually disabled.

Following the same method, there are plenty of stuff the bot can write in the chat, using the many IFTTT channels. Fantasy is the limit :)

How to setup a Google App Engine Python environment, on Mac OSX, using Homebrew

I want to create Google App Engine apps using Python SDK on my OSX machine: setting up the enviroment should be easy, but I neverthless spent some time putting together all the required pieces. The whole process is composed by four parts: install Homebrew, install Python 2.7 thru brew, install Google App Engine Python SDK and setting up the project environment. Let’s go step by step.

Homebrew

Simple and straightforward, instructions on Homebrew homepageXcode Command Line Tools is the only prerequisite.
Personally, I’ve used a different install folder (a different prefix) instead of /usr/local, but it’s just me and some bottles could not work. So the suggestion is to stay with the default prefix. Here the step I used:

xcode-select --install
curl -fsSL https://raw.githubusercontent.com/Homebrew/install/master/install &gt; ~/brew.rb
sed -i '' 's/HOMEBREW_PREFIX = .*/HOMEBREW_PREFIX = "#{Dir.home}\/tools/homebrew"/' ~/brew.rb
ruby ~/brew.rb

Then I added the Homebrew custom prefix to my PATH adding the following line at the end of ~/.bash_profile

PATH=”$HOME/tools/homebrew/bin:$PATH

To check that everything works, a call to brew doctor should return just a warning about the custom prefix.

Python

Once Homebrew is in place, install Python is a breeze:

brew install python

Then, I installed the additional tools required to properly work, pip (already installed with Python 2.7, but it may need an update) and virtualenv

pip install -U pip
pip install virtualenv

Google Cloud SDK + App Engine Python

Even if the site suggest to download GoogleAppEngine Launcher, I chose to use Google Cloud SDK, in order to have one single point of access for all the Google Cloud related stuff, instead that different runtimes scattered around my machine:

curl https://sdk.cloud.google.com | bash
exec -l $SHELL
gcloud init

The init command also update ~/.bash_profile, adding auto completion and updating the PATH for the Google Cloud SDK. These two lines

source ~/tools/google-cloud-sdk/path.bash.inc
source ~/tools/google-cloud-sdk/completion.bash.inc

Finally, I added the GAE Python SDK with

gcloud components install app-engine-python

Setup the first GAE project

Time to create the first GAE Python project. Luckily, official documentation has everything to start and succeed, and the section “Download the App Engine SDK for Python” can be skipped because of the Google Cloud SDK already installed.
Real problems arrive when additional Python library are required, like Flask. Following the official steps suggested here has one big problem: when executing the command pip install -t lib, the following error occurs:

DistutilsOptionError: must supply either home or prefix/exec-prefix — not both

It’s a well known bug of Python installed with Homebrew, and the workaround proposed didn’t worked for me. After some searching, I was able to solve the problem using a properly setup virtualenv environment and a symlink. Inside the project folder:

virtualenv env
source env/bin/activate
ln -s env/lib/python2.7/site-packages lib

Then, it’s important to skip the upload of virtualenv environment files, adding the following lines to the app.yaml file. GAE will continue to upload all the required libraries from the lib folder (a symlink to the lib folder inside the virtualenv), so no need of the entire env folder:

skip_files:
- ^env$ #virtual environment's folder

Finally, it’s possible to create the appengine_config.py to enable vendoring and inclusion of libraries in the lib folder, as per the official doc.

from google.appengine.ext import vendor
# Add any libraries installed in the "lib" folder.
vendor.add('lib')

Ahh, time to install some lib, edit files, launch the GAE dev server and start coding!

pip install flask
#(add and edit your files)
dev_appserver.py .

Identify your Twitter followings older that 4 months

Spring is all about cleaning, the saying goes, so why don’t apply the same principle also the the accounts I follow on Twitter? Why? Because I would like to maintain their number under 400 and because I would like to grow my very limited Python skills.

With the help of TweetPony (among the many), the task was pretty straightforward. Final result is a simple script that checks for the people I follow, verifies their last tweet date and alert me if it is older than four months.

Configure the Python environment (Ubuntu 14.04 Trusty)

I don’t want to pollute my system-wide Python installation with libraries and dependencies related to a single project, so I created a virtual environment. Still not a master on that, so forgive my errors:

apt-get install python-pip
sudo pip install virtualenv
cd %projectdir%
virtualenv build_dir
source build_dir/bin/activate

From now ongoing, all the pip commands will be execute inside the (build_dir) virtualdev, and not at system-wide level. Time to install the TweetPony library:

sudo pip install tweetpony

Once installed, I tried some examples from the GitHub repo, to check if it worked. And yes, it did (even without api key and permission, see later), but a boring console message appeared every time the script made a call to Twitter API, caused probably by the old Python 2.7.6 version or libs I was using:

InsecurePlatformWarning: A true SSLContext object is not available. This prevents urllib3 from configuring SSL appropriately and may cause certain SSL connections to fail. For more information, see https://urllib3.readthedocs.org/en/latest/security.html#insecureplatformwarning.
  InsecurePlatformWarning

In order to solve it, I installed some dev libraries required to compile some other Python libraries (again, inside the virtualenv only)

sudo apt-get install libssl-dev
sudo apt-get install libfii-dev
pip install cryptography
pip install pyopenssl ndg-httpsclient pyasn1
pip install urllib3

and added these lines of code at the beginning of the main function of the script, before any Twitter API call:

import urllib3.contrib.pyopenssl
urllib3.contrib.pyopenssl.inject_into_urllib3()

They made the trick! But, as I said, probably you may not need all of these.

The script

The script itself it’s pretty simple. I took the basic code to create the TweetPony API object from the repo’s example folder and I was able to get user’s friends_id (the account the user follows). Then, cycling thru each one, I checked the status of that friend, watching for last tweet date. Some cornercases management (like private tweets or no tweets at all) and voila’, I had all I needed.

Regarding authentication, all Twitter’s libraries require a consumer key and consumer secret to work, in addition to an OAuth access_token and access_token_secret. What made me preferred TweetPony to other libs, like tweepy or python-twitter, was that TweetPony doesn’t required anything. Test consumer key and secret are gently embedded into the lib source, while OAuth tokens are created on the fly for you and persisted over a file, .auth_data.json. To use new credentials, simply delete the file and add somewhere, at the beginning of your code, these two lines, with key and secret obtained from Twitter Dev Console:

tweetpony.CONSUMER_KEY = 'xxxx'
tweetpony.CONSUMER_SECRET = 'xxxxx'

Final consideration about Twitter API usage: there is a limit of 180 calls every 15 minutes, so I added a sleep after every check. Slow, but it worked with my 500+ followers :)
Continue reading “Identify your Twitter followings older that 4 months”

Advanced dev tips for the Android Wear, Droidcon Turin

You first Android Wear app is finally complete. A working notification system, a couple of custom wear activities and an exciting voice input
control. Now what?
In this session, you’ll learn about some of the advanced Android Wear programming guidelines, code optimizations, useful community libraries, best UI patterns seen so far, brilliant watch faces, pitfalls to avoid and other “real world” Android Wear tips’nd tricks.

(Droidcon Turin, 9th April 2015)

The second screen world in the Google Cast era, Codemotion Rome

TVs are the biggest, most beautiful screen in people’s living rooms. Google Cast is a technology that enables true multi-screen experiences for the users. Integrating Google Cast into existing applications is simple, and we’re going to cover the SDK and resources available to make your application Cast enabled really easily. Android, iOS and Web. Possibilities? Endless: not only casting video or audio, but also games where the TV becomes the new and high-tech game board or a variety of other apps to enjoy with friends, sitting together on the couch.

(Codemotion Roma 2015)